Posts

Substance Painter Part Two

Image
After I unwrapped the models, I went to Substance Designer and created three textures. I created a wood texture for the wood on the building, the concrete for the sidewalk, and a road texture for the road. Finally I went to Painter to paint the textures on every model I made. With the textures I created, I was able to finish every model.

Substance Painter Part One

Image
For this project, we had to paint the house and also the diorama that I created. My diorama is based on a character standing on top of a building looking down to the crowd, seeing an old building out of place. After setting up the scene, I unwrapped every building I modeled to prepare them for texturing.

Texture Part Two

Image
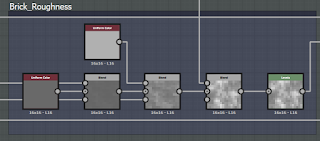
For this part of the wall texture, we make sure add the roughness noticeable. Mainly adding cracks or bumps to make it look old. We also create the substance to for the inside of the wall, the mortar. The first step is to making sure the mortars are visible, and make a dent to the brick portions making it look ike the bricks are poking out. Even add some details to make it look old. By the end of the finishing up the texture, you need to create a color, height, and roughness, to be exported. You need to export it just in case if you need to move to a new computer or when you need to edit or add textures in substance painter.

Texture Part One

Image
For this class, we learned how to create textures using Substance Designer. Our assignment was to create a wall texture. I nailed the wall itself, but I had issues with the color. When it came to create the wall, there are multiple steps into creating textures. In Designer, it is technical to create them and it's best to keep organize. The first step is to create the shape the brick themselves. The first step is to make the shape of the brick, making them able to blend shadows. To make the repeat patterns, you put in the generator to create the tiles. You can also add the design of damage to bricks, either by cracks or dust. For adding colors to it is quite special. There is a way to repeat the color of the reference photo, by simply dragging and clicking, but there was a problem for me. When I try to extract the color, it went black and getting anything. So I try to make it look old with a green taste. You can also add dust to give it an old feeling.

UV Mapping Part Two

Image
I finished the UV mapping and here is the result. The inspiration for the Unwrapping comes from these photos: Plus my entire photo reference is in this link of my pinterest. https://www.pinterest.com/gjkern353/uv-mapping/

UV Mapping Part One

Image
Here is what I have so far for UV mapping